Most of the time, I'm sure that I'm just writing into the void, since this blog only started out as a way for me to keep track of what I do to my car. Since the beginning of the blog, I have gotten more views, both on my youtube account and my blog. This lead me to believe, "Hey! People actually read my stuff."
Therefore, I thank those of you who actually read my blog posts from time to time. I'd like to think my DIYs or product reviews actually help you guys.
Okay, well, onto the purpose of this post. For those who know me in person, or who have been reading the blog from the start, I brought my Camaro home on April 6th, 2010. This is a significant day for me, not only was it the day I brought back this beautiful car, it was also the day I started to care and learn about cars. I don't know what to say, without this Camaro, I may have never learned how to change my own oil, remove a car bumper, install an intake system, paint my own engine cover, or create my first circuit.
The number of mods I have gotten done, the amount of time and money I have spent, and the blood and sweat that I literally went through to get my car to where it is today, is just mind blowing to me. If you asked me about cars a year ago, I wouldn't even be able to tell you how much torque my engine puts out at the fly wheel. But now I'm servicing my own car? Haha, crazy eh?
Well, if you wondered how much I have done/spent since April 6th, 2010, here is your answer:
--COSMETIC/MISC MODS--
4 Gauge Auxiliary Pack - $370 (Thanks Gene @ GM Parts House USA)
Floor Mats - $110
Splash Guards - $145
Car Cover - $255
Racing Pedals - $80
Billet Door Plates - $80
Door Sills - $190
Tail Light Blackouts - $30 (Thanks Reggie @ The Camaro Decal Store)
Sequential Tail Lights - $100 (Thanks Web Electric)
HOD Headlights/LED fog lights/Red Footwell Lights/Interior Conversion kit - $215 (Thanks Darren @ Whiplash Auto)
Stillen Front Splitter - $150 (Thanks Josh @ Stillen)
Engine Cover/Fuse Box paint - $50
--PERFORMANCE MODS--
Injen Cold Air Intake - $320
Corsa Catback Exhaust - $1150 (Thanks Ivan @ Southwest Speed)
To the people I thanked above, you guys know who you are, you've done a great deal for helping me in my project. The guys I have mentioned are awesome guys, either they gave me huge discounts, or gave me free gifts as a token of their appreciation. All have provided excellent customer service, no bias, just facts.
That was basically 2010 in a nutshell. I know the year is not quite over yet, I will continue to post from time to time, but it won't really be about mods. Some financial lifestyle changes are taking place in my life right now, so I don't really have the budget to continue modding this year. However, the modifications will carry on in 2011 for sure. If you're as curious as I am about what I'll be doing next, then be sure to stay tuned.
Thursday, September 30, 2010
Tuesday, September 28, 2010
BMW is the $hit

Saw this picture featured on an older episode of Top Gear. This image really made me laugh, because these snarky ads are always entertaining to look at. Obviously, they don't mean any harm, when your company is high up on the corporate ladder, you'll eventually be bashed by one organization or another. Too good for your own good, you see. =)
However, a small discussion can be brought up from this spoof campaign. I was in a very asian dominant part of town a couple of weeks ago, and my brother and I were standing in a parking lot, and we were counting the number of Hondas, and BMWs parked there. We'd realized, there were mainly four makes of cars people in this part of town actually buy. On the lower end of the price range, we saw 90% were dominated by Hondas and Toyotas. While on the higher end of the price range, mostly BMWs and Mercedes. The funny thing is, BMWs seem to be like the 'go-to' car for people who are more financially stable. I think at a point in time, BMWs were the special cars that only special people could buy (rich people). When you say, "I drive a BMW!" people used to reply, "WOW, you're rich!".
However, nowadays when you say, "I drive a BMW", people will reply "So? My dad has one", "My mom has one", "My friend has one". Everyone has one. Reminds me of Apple products actually, you used to be the only 'cool' kid with a touch screen Apple product, and now everyone has one.
Saturday, September 25, 2010
Can't trust anyone but yourself
Last week, I took my car to Mopac Performance and auto supplies to get my Corsa exhaust installed. Well, they installed my exhausts in an hour, but I wasn't able to watch the mechanic work on my car. The only thing I saw him doing before I left was him taking a saw to my car! After a week of driving, I started to hear slight rattling. The only thing that has changed since last week was the exhaust install, so I assumed it was because of a bad install.
I went out to my car this morning, and I went under the car to make sure everything was installed properly. Turned out, the mechanic didn't tighten all the nuts and bolts to the specified torque settings! Bastards! This is why I don't trust other people working on my car. I can't really hold him accountable, because he might possibly make some excuse. Regardless of how pissed off I was, I decided to fix things myself, AGAIN. I spent an hour under the car, tightening all clamps to 45 ft-lbs of torque.
The only reason why I even took my car to the shop, wass because I didn't have a lift, and I wasn't too positive on installing exhausts on jack stands. Man, if I had a lift or a shop to work at, I'd do this myself lol.
My personal advice to all you car lovers, if you love your car, you will work on the car yourself. Maybe I'm just unlucky, but I've had my car at the shop a couple of times, and everytime I get the car back, something else is wrong. The thing is, if you work on the car yourself, you only have yourself to blame, and lets face it, it's easier to forgive yourself. When you have someone else screwing up your car, you'll spend so much time hating them and hating yourself for trusting them. In my opinion, not worth the stress... I want to live long and happy lol. Just remember, these "professionals" are just humans too, and nothing makes them any more qualified than you. I went to another shop called Drive Hard a couple weeks back. I went with my brother to get his intake installed on his 99 Honda Prelude. One look at the mechanics, and I realized, "What the F-bomb? They are just teenagers". They had to look at the instruction booklet just like you and I, and their install left the Prelude with a mis-attached bumper. I spotted the mistake right away, and I told them to fix it. They replied, "Huh? that's weird..."
Seriously? What are we paying you for?
Let me give you all the verdict on Mopac, or any other shops for that matter: Don't go, unless you absolutely need to. I'm sure you all have friends around you that know how to work on cars, gather them together, you guys would be just as qualified.
Friday, September 24, 2010
Care package!
A couple of weeks ago, I was taking some photos for Stillen. They had wanted some photos of their V6 Camaro Splitter products on actual cars, so Josh from Stillen asked me to snap a few quick pics for them to use. He told me he would give me a $25 gift card in return for my troubles. Frankly I don't work on my car, write on my blog, or make youtube videos for profit. I do it because I love to do it. Therefore, I told Josh that I'd take the pictures for free. However, he insisted on giving me something in return, so I asked for a Stillen t-shirt instead of a gift card.


Well, as promised Josh sent me some goodies in the mail! I like the t-shirt! Too bad it wasn't a Camaro printed on the back of the shirt lol, but hey, it's a gift, and I love it. It took about a week for the package to get here, and frankly I wasn't even sure it was coming, so I was very excited when the package arrived in the mail. Everytime I get a package at the door, it feels like Christmas morning. Anyway, as I have said, Josh sent goodies!

Why didn't I think of a hat? Well, thanks for the hat too Josh! The cap is a bit bigger than my head size, but it is still wearable. I went to the bank today, and the teller asked me if I was a big racing fan. I was kind of shocked and confused at why he had asked, and before I could answer he pointed to my hat. We talked for a bit, and he told me he used to drive a Mustang GT, and I told him that I drive the Camaro. It's funny how conversations can be started just by the clothing apparel you wear.
Monday, September 20, 2010
Corsa, blows me away!
It's a long debate on any car, "What is the best exhaust for my car?". Everyone has different tastes, and wants different things out of their products. In the area of exhausts, you can never really get a straight answer of which brand produces the best exhaust. There are a couple of things people consider when purchasing exhausts, or any modification, and they usually narrow down to three things: Price, sensory satisfaction (looks/sound), and power gains (if applicable).
Obviously I am not an oil tycoon, so I am only able to buy one exhaust system. Therefore, before I review any further on my selected exhaust, I can honestly say I will be biased on most parts. However, I will be as fair as I possibly can, and let you, the viewers, decide.
In an older post, I was complaining about the costs of mods, and that I had my eye set on an exhaust system that costed more than I had anticipated. Well, I went with that same exhaust I had complained about, the Corsa Performance Exhaust system.
 Now, if I am to be fair in this review, I will do it here. The Corsa is by far the most expensive full catback exhaust system for the V6 currently available. Heck, I have even seen V8 systems that don't cost as much. Smart car modders may stay away from this system, mostly because they know the price isn't worth the gains. Corsa claims to free up airflow compared to the stock exhaust system, which also frees up to 6 ponies and 7 ft-lbs of torque. Realistically, modders know that the stated power gains won't really translate to much on the dyno. Then, why would anyone pay $1200 for this exhaust system? Two of the three categories I have mentioned earlier are already unsatisfactory, price and power gains. Would you really be willing to pay $1200 for just sound and looks then? Here's the funny thing, 'there's more to the Corsa than meets the eye'. (LOL I'm so lame)


 Look at those huge mufflers that come with the stock system. I have heard each muffler weights 24 lbs each! Also, the mufflers are so big that if you bend down a little bit, you can see them under the car. A lot of people even go through the trouble of spray painting the mufflers black.
No, that black stuff under the muffler isn't my attempt to paint them. Apparently there are 2 holes under the mufflers to drain any water that may get into the exhaust tips. The black is from the soot leaking out with the water!
The last thing I will say about the Corsa is that it seems like a very smart exhaust system. It is very quiet when you want it to be, and very loud when you push the car a bit harder. On the day after the install, I took the highway back home. I had to merge into the highway, but the car directly infront of me was going too slow to merge in time, so I hit the gas, and passed him. I felt like a ninja, because when I accelerated, my car became a beast on wheels, and heads were turning to see what was causing the roaring! Sneaky! I didn't even mean to be that loud, I just wanted to over take a guy. Needless to say, I was shocked at how loud the exhausts became. Also because of Corsa's dual insulated mufflers, it actually has a break-in period, so when the mufflers breaks in, it will be even LOUDER! Hoorah!
Obviously I am not an oil tycoon, so I am only able to buy one exhaust system. Therefore, before I review any further on my selected exhaust, I can honestly say I will be biased on most parts. However, I will be as fair as I possibly can, and let you, the viewers, decide.
In an older post, I was complaining about the costs of mods, and that I had my eye set on an exhaust system that costed more than I had anticipated. Well, I went with that same exhaust I had complained about, the Corsa Performance Exhaust system.

Here is where I can be a bit more biased; I absolutely love the sound of this system. It has a deep enough tone, it's not deafening, it's rich enough, it doesn't sound too muffled nor hollow. Like I have said in the beginning, everyone has different tastes, and I respect that. Corsa has really put a lot of thought into their system, here is the link to their product description and features. One of the most annoying things after installing an AEM exhaust system is the droning that occurs when you are driving. With Corsa's Patented RSC™ Technology, that annoying drone has gone bye-bye. The full system is made from 304 stainless steel, which means when your car is a rust bucket, the exhausts won't be. The Corsa system also comes with a lifetime warranty, which helps me justify the cost of the system.

Stock exhaust tips are 3" in diameter.

Stock exhaust tips are short and skinny

Corsa delivers polished 4" tips!

Nice and Shiny!
A couple of more good things about AEM exhaust systems, they weigh much less than stock exhausts. The whole Corsa system weighs around 70 lbs, while the stock system weighs around 90 lbs, 20 lbs lighter! You really can't go wrong with an AEM exhaust, sounds great, more airflow, weight reducing; your car should be a lot quicker at the drag strip.

No, that black stuff under the muffler isn't my attempt to paint them. Apparently there are 2 holes under the mufflers to drain any water that may get into the exhaust tips. The black is from the soot leaking out with the water!
The last thing I will say about the Corsa is that it seems like a very smart exhaust system. It is very quiet when you want it to be, and very loud when you push the car a bit harder. On the day after the install, I took the highway back home. I had to merge into the highway, but the car directly infront of me was going too slow to merge in time, so I hit the gas, and passed him. I felt like a ninja, because when I accelerated, my car became a beast on wheels, and heads were turning to see what was causing the roaring! Sneaky! I didn't even mean to be that loud, I just wanted to over take a guy. Needless to say, I was shocked at how loud the exhausts became. Also because of Corsa's dual insulated mufflers, it actually has a break-in period, so when the mufflers breaks in, it will be even LOUDER! Hoorah!
Sunday, September 19, 2010
Engine Cover complete, finally!
Okay, for about a week now, if you have been following along, I have been working on painting my engine cover. Well, after fitting in time between errands and work, I have finally finished the engine cover! Ta-da!


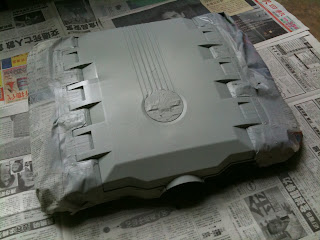


Although it may look cool in the picture, at least to me it is, but there were some problems. I won't even pretend to know what I'm talking about, since this is my first paint job experience, but I took the pictures for a DIY, so use my instructions at your own discretion. For this project, you will need the following: Adhesion promoter and/or primer, color paint(s), clear coat, masking tape, news paper, 600 and 2000 grit sand paper.

Remove your engine cover, and clean it well. Most people use wax and grease remover or rubbing alcohol after a good soapy wash. I didn't do it lol. I just used dish detergent and washed that bad boy.

Use masking tape and start masking off the areas you don't want painted. I started with the logo. If necessary, just use an X-acto knife to make precision cuts.

With the masking complete, set up your paint booth. Make sure you are spraying in a well ventilated area; outside is preferable.

I went with the primer, because I couldn't find any adhesion promoter. Give it a couple coats, 2-3 light coats is ideal. Wait around 3-5 minutes between each coat. Depending on your primer color, it should look something like this. If you want your final result to look glossy, take your 600 grit sand paper and sand down the orange peeling on the cover, AFTER the primer has dried for at least 30 minutes, then apply more primer. Rinse and repeat until satisfied.

After your primer is set to dry, 30 minutes minimum, you may want to clean your cover again. Same thing with the primer, apply light coats, giving 5-10 minutes in between to tack. If you go too heavy with your sprays, you will get running and an uneven look to the paint. You can search online for painting techniques.

After your paint has dried, you can move on to the clear coat. This is my first pass with the clear coat. I did a total of 3 passes. The game is the same, apply 2-3 light coats on top, and wait 5-10 minutes in between before you move on. After the clear coat has dried completely, get your 2000 grit sand paper and some soapy water, and sand down the clear coat lightly. Then dry it off with a towel, you will definately see some orange peeling. Basically, we are trying to get the surface as glossy as possible. To do that, you have to get rid of the orange peeling, which is caused by the high spots in the paint. DO NOT SAND DOWN TO THE PAINT! MAKE SURE YOU STAY WITHIN THE CLEAR COAT!
If you have any doubts about how far you should sand, then I'd suggest you take it slow and don't sand too much. If you sand into the paint, you'll have to sand down all the clear coat and re-paint the color.

I know the images are in different lights and angles, but I promise you, there is no trick photography going on here. This is genuinely how it looks! However, this is after the third clear coat spray, so by this stage of the image, I have sanded down the clear coat twice. I would have sanded down more, but I ran out of clear coat, lol.

After you let the clear coat dry, I would suggest leaving it overnight, you can slowly remove the masking. Be careful when you take off the masking, the paint and clear coat may bond with the mask, and if you rip off the mask too fast, you may strip some of the paint with it. I did it by mistake, but it's easily avoidable, just take an X-acto knife and use it to guide with the unmasking process.

Continue unmasking, take your time, you are almost there.

Not too shabby!


I love red on black! This is just the start for my engine bay. Hopefully I'll have more budget soon for more fun!
The images hide most of the flaws I have made. On my first unmasking, I lifted a bit of paint off the primer, so there is a bit of gray on some of the edges... looks ugly. I will touch those up later.
So if you feel artistic or bored, I would rate this as a fun DIY. You spend about $40 for this DIY, rather than spending $150 on a OEM painted engine cover, so it's worth it. Just remember, take as much time as you need to make it look as good as possible.
Saturday, September 18, 2010
Even Geek Squad wants Camaros!

Or maybe they thought, "Let's use a good looking muscle car as our representation, so all customers will think they drive mad sports cars when they use our service."
Not trying to be snide or anything, but that's just me thinking out loud. Eitherway, it is cool to see that the Camaro is a go-to icon, I mean just look at those Geek Squad and Best Buy labels on the fender. It's about time generic images of sports cars are changed, I was getting bored of the 350Zs and the Mustangs!
Friday, September 17, 2010
Pulled the trigger, and then some
Well, my Corsa exhaust came in today, it costed me quite a bit of dough, but hopefully it will be worth it. Right now, I am deciding whether or not I'll be installing the exhausts myself, or getting a shop to do it. I'm dealing with a lot on my plate right now, so the exhausts won't be installed till a couple of weeks later. Special thanks to Ivan at Southwest Speed for the awesome deal and free shipping! More on the exhausts later...


Coming up soon is the finished engine cover mod, which I'll be posting about in the next couple of days.
Thursday, September 16, 2010
Another Stillen Feature
Well, it was bound to happen. Prior to my splitter install, I had no luck finding anyone with a splitter on the 2010 V6 Camaro. Now, after my splitter install, I am proud to say I have gotten a couple of people hooked on the splitter look. Today, I would like to feature Chris's 2010 Chevrolet Camaro LS. I have to say, he did a very good job on the install, and the car looks fantastic!


The car looks like a million bucks! The white and black mixed together are a deadly combination.
Chris explained his install to me, and it seemed that my splitter install was made more complicated than it had to be. Chris did not have to remove his bumper, he just got the car on ramps and worked away there. There were also no adhesive issues with his splitter, perhaps Stillen realized they had to use stronger tape? LOL =D
Well, I am glad my car was the guinea pig, and hope more people get the splitters! Here are some of the other pictures Chris has kindly sent me.


Wednesday, September 15, 2010
Shots from riding around
Well, I'm still painting my engine cover. I'm trying to do it right, so it's taking longer than I'd thought. Eitherway, because of the busy week, I've been driving around more, so I took some random pictures.


This was pretty sweet. I've never seen a Lotus Exige up in person. The car is extremely low, and extremely small. I'm a short guy, and I think I'd have problems getting in the car!

My brother getting his intake installed, so I parked beside this Shelby Mustang. WAZAH!

At a hardware store buying stuff for mods, just couldn't resist taking a picture. Never gets old does it?

The footwell lights look good even in daylight! This looked awesome, the natural ambient bluish day light, mixed with my red lights created a great image.
Almost done with the engine cover though, it will probably take me a day or two more to sand the clear coat smooth to a glass shine! Also some news on the exhausts, I have made the order, but more on that later, so stay tuned!
Monday, September 13, 2010
Concepts for fun
Lately I've been interested in some cosmetic mods, particularly for car shows. Coming from an artistic background, I thought it would be nice to reflect some of my own creativity into my car. Obviously nothing as elaborate like painting a flaming skull scorching on the hood. In the beginning, I saw my car as just black and silver. However, now I feel like I need to introduce a bit of red into the car. To be honest, black with any color looks gorgeous: black and yellow, black and blue, black and orange, black and green, you get the idea.
Red was just the most obvious choice, I had already added red interior lighting, so I plan to continue with black, silver, and red. The next question was, "What should I do?"
Looking around at what other people are doing, I see people dressing up their engine bays. The engine bay, I find, to most people are like show rooms themselves. You open the hood, and you see hints of bling, lights, and artwork everywhere. Half of what makes your car a winner at a car show is how well you detail your engine bay. I have to say, I can somewhat see why now. Honestly, I have never cared about engine bays in the past, but now I understand. I had decided that modding the engine bay was the best place to start because if I had screwed up, worse comes to worse, I just wouldn't pop the hood =D.
As of now, I have worked on almost every category of a car. I've changed the oil, removed the bumper, replaced the intake, swapped light bulbs, soldered wires, tapped into power, drilled and bolted the splitter on, blacked out lights, and the list goes on. However, I had yet to touch paints. Therefore, my first engine bay project was to paint the engine cover, and the fuse box. As of now, I am already in the process of completing the engine cover, but I wanted to share my process up to this point. Here are two of my concepts I had narrowed down to. Which one did I choose? I will show you when I am finished.

Friday, September 10, 2010
Cars aren't a smart hobby choice
I found out today that the exhaust system that I have been saving up for is a lot more expensive than I had originally thought. Seriously, when you love cars this much, it's really hard to say no to a couple of goodies. As always, you shouldn't break the bank investing in anything, whether it's a house, cars, or relationships lol. I'm not saying don't spend money on those things, but just know the limit, and make sure you always have a rainy day fund. Before I get into further details, here is a track that I always like listening to while I'm driving. I thought I might share it, most of you have probably heard it, it was in the Transformers movie soundtrack. The song was also played during the pursuit scene with Barricade (Saleen Mustang) and Bumble Bee (2nd Gen Camaro) in the first movie.
As I was saying, I have been saving up for a couple months for a complete cat-back exhaust system. I have jumped from exhaust to exhaust for a long time now, debating which one I had wanted. Either the system has cabin droning, doesn't sound nice enough, the quality wasn't great, or no power gains. Not like I expect too much gains from an exhaust system, but I would like the peace of mind that the air flow is significantly increased. Basically, I am looking for three things in an exhaust system: sound, power gains, and price. Well after months of searching, I came to the conclusion that Corsa was an ideal product. The price was the only issue, too much for me right now, and it hardly seems worth it for an exhaust system.
Then again, true car enthusiasts wouldn't really hold back because of pricing. You see people with outrageous wheels, they look gorgeous, but it serves no other function than just to be gorgeous, they still function as regular wheels. I guess all car mods also hold a double-entendre: social status, and the actual function of the mod.
I'm still aiming for the exhausts though, hopefully I will have them installed soon. Just wanted to point out, even for me, I was shocked at how much I'm spending on my car lol. Just remember, don't break the bank just to prove yourself. One of my friends recently told me about his co-workers. They all drive very nice cars, and they say that they regret buying an expensive car, and wished they had used the money for school.
What do you think?
Wednesday, September 8, 2010
Footwell lights - process and install
Finally, after a whole month of waiting, I have finished installing all of my lighting goodies. For those of you who were following, I bought four sets of lights for my 2010 Camaro from an AACStyle re-distributor called Whiplash Auto. If you are interested in custom lighting for your car, I highly recommend you checking out these websites.
The first set of lights were my headlights, the HOD 5500K halogen bulbs. Then I installed the red LED dome and trunk lights. Next I had the super white LED fog lights installed, eventhough I didn't have a full blog post on it, you can see pictures of it where my splitter was installed. Since the fog lights were most accessible when the bumper was off, I just ended up swapping them out then. Last but not least, I had to install these CCFL footwell light bars. Now, everything before the footwell lights were directly plug and play, which meant, literally, changing the light bulbs. The footwell lights took a bit more thinking and planning. The footwell light kit comes with a couple of things: Two CCFL light bars, two power inverters which contains a fuse each, a light switch, and some zip ties.
Before I start writing the DIY tutorial, I want to tell you that my pictures are limited. My steps are the exact same steps as TonyNo's, except for the parts I will be explaining. If I have an image up and an explaination, this means I have diverged from his tutorial, and it is really up to you for who you want to follow. Also, I take no responsibility for any damage you may do to your car or your lights. Please know that this tutorial isn't for the faint of heart, and if you are uncomfortable doing your own circuitry work, please find a professional. So, lets get to it!


The first set of lights were my headlights, the HOD 5500K halogen bulbs. Then I installed the red LED dome and trunk lights. Next I had the super white LED fog lights installed, eventhough I didn't have a full blog post on it, you can see pictures of it where my splitter was installed. Since the fog lights were most accessible when the bumper was off, I just ended up swapping them out then. Last but not least, I had to install these CCFL footwell light bars. Now, everything before the footwell lights were directly plug and play, which meant, literally, changing the light bulbs. The footwell lights took a bit more thinking and planning. The footwell light kit comes with a couple of things: Two CCFL light bars, two power inverters which contains a fuse each, a light switch, and some zip ties.
I usually save the video till the end of the post, but somethings you shouldn't save the best for last. Hope you enjoyed it. Now lets get into my process with these lights!
As I have written above, the kit comes with a lot of goodies. Basically they were trying to make the install as painless as possible. To be honest though, the process of getting this install done was harder than it looked. I had to search the net to see what some other people have done; I wanted to know what options there were for installing the footwell lights. AACStyle suggested that we tap into the fuse box and have the lights turn on via a light switch provided. I had felt that turning the lights on and off WHILE your inside the car defeated the purpose of having the footwell lights, unless you planned to use it for car shows. Then I came across a very good DIY tutorial posted by a member of the Camaro5 Forums, screen name, TonyNo. You can view his tutorial here. I would like to credit him for his help and smart modification.
As you have seen in the video, the lights were very well integrated. This is because I tapped into the dome light wire. Having the footwell lights connected to the dome light made the most sense, because when you open the door, your lights illuminate your way in. The problem with having a custom switch to turn it on and off, is that you will never have the car greet you as nicely. Also, since it is hooked up to the dome light, when you switch the lights on or off, the footwells would react the same way. As I have said, better integration overall.
Before I start writing the DIY tutorial, I want to tell you that my pictures are limited. My steps are the exact same steps as TonyNo's, except for the parts I will be explaining. If I have an image up and an explaination, this means I have diverged from his tutorial, and it is really up to you for who you want to follow. Also, I take no responsibility for any damage you may do to your car or your lights. Please know that this tutorial isn't for the faint of heart, and if you are uncomfortable doing your own circuitry work, please find a professional. So, lets get to it!

Stuff you will most definately need: Soldering gun/iron, solder, wire cutters, wire stipper, electrical tape, shrink wrap tubing, ring/spade connector, socket wrench with 10mm socket, zip ties, X-acto knife, and your lights. NOTE: TonyNo's tutorial does not require a soldering gun and solder. His method is using insulated wire connectors, so you just need a wire crimper instead.

If you are using my tutorial, this means soldering is necessary. A little back story, TonyNo used t-tap connectors for this part. I would have gone with his route because it makes your life a whole lot simpler. However, due to me not being able to find t-taps available for purchase I decided to go with a different method. If you are going with my method, what I want you to do is stick your head under the steering wheel. Right above the gas pedal you will see many harnesses with assorted colors. I want you to pull out the gray harness. There is a release tab on the top of the harness, pinch it, and pull straight out. When you do that, you will hear you car doors lock itself. Don't worry, you can unlock it. I have double checked, pulling this harness won't damage anything, and won't give you a Check Engine Light (CEL). The reason for pulling this harness out is so that we have more room later for our process.

We are going to be tapping power from the gray wire attached to the gray harness. I know it's hard to see in the picture, but I have stripped the wire insulation of the gray wire, leaving just the copper wire exposed. To do this, you will need some steady hands. Take your wire STIPPER, not cutter, and snip two cuts into the wire, about an inch apart. Now take your X-acto knife and slice down the center from one end of your cut to the other. Do not press the knife too hard, because your finger will be behind the wire. I gave it a nice gentle cut first, then a second one, and finally cut through it on the third run. I HAVE TO BE CLEAR ON THIS, YOU ARE ONLY CUTTING THE INSULATION AWAY FROM THE WIRE, AND NOT CUTTING THE WIRE ITSELF!

So you take your lead wire(s) and twist them onto the gray wire that we had exposed, and you solder them together. Finishing up, you wrap the wires with some electrical tape, then replug the harness. The rest is the same as TonyNo's tutorial. However, I also soldered my negative wires to the ring connector, instead of crimping it.

Finding the right place to mount the lights was actually a pain in itself. For the drivers side, please do not mount the lights too close to the OBDII port. It would be a pain for you to have to access it if your lights are in the way.

The passenger side was a bit tricky. There is a glove box in the way, so make sure when you open the glove box your lights won't snap in half lol.
Overall the installation process went smoothly, other than the above mentioned light placement, and also getting under the dash really asked for you to become a contortionist. My back is hurting as I am writing this, but man is it worth it. Hope you had fun reading this post, it was a long one, and hopefully this will inspire you all to illuminate your feet! =D Cheers!

Saturday, September 4, 2010
Photo shoot for Stillen
Interesting how the internet works. I posted my Stillen Splitter install on Camaro 5 Forums a couple of weeks ago, and it was noticed by Stillen. I was contacted by a Stillen representative a couple of days ago, and he's asked me to take some more pictures of their product for the V6 Camaro, so that they can post the product pictures for their customers. Therefore, at his request I have done just that.


Just a few quick pictures here and there. Eventhough it may look like repeats of some of the older pictures I have taken, but I can never really have enough pictures of my car. Maybe it's just me.
Subscribe to:
Posts (Atom)